Screen Replacement (Old process - Archived)

Note 1: We have 2 types of replacement screen component.

  1. Screen spare part with mid-frame attached (New) - Use the new guide.
  2. Screen spare part only (no mid-frame attached) - Continue reading.

Note 2: In high likelihood you have received the new style spare part (with mid-frame). Please confirm and refer to the new guide.

If you are not sure, please contact us to confirm which guide to use.

Old Process for Screen part without the mid-frame

Only Proceed if you are sure of your screen part type. Check the notes above.

In the event that the phone’s screen is damaged, it may be possible to replace the screen yourself.

Materials

  • Replacement Screen
  • Adjustable heat gun or hot-plate
  • Suitable adhesive, like B7000
  • Small Phillips-Head screwdriver
  • Spudger

Caution

  • If possible, back up your data before attempting to repair the phone. While this procedure should be fairly simple, it does involve working with tools near delicate components, and it’s possible the phone could be permanently damaged.
  • A broken screen may contain sharp pieces of glass. Wear protective equipment when working with broken glass, use a tool when prying or moving glass pieces, and work over a surface that will let you keep track of, and dispose of, any loose glass.
  • Heat guns and hot-plates can cause burns and start fires. The temperatures used for this process should be safe, but caution is still advised.

Steps

1. Remove the battery cover, battery, and upper board cover.
Follow the disassembly video below until the 1-minute mark:
Teracube 2e Disassembly - YouTube
 
2. Unseat the display ribbon cable.
Use a fingernail or small, thin screwdriver to flip the latch up. This will free the ribbon cable to slide directly out of the slot.
2eRibbonConnector
 
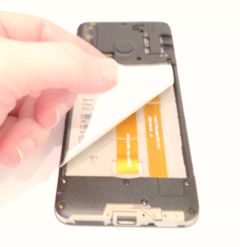
3. Peel up the information sticker
The ribbon cable is attached permanently to the display and must be removed at the same time. The information sticker must be removed to free the ribbon cable.
PeelInformationSticker
 
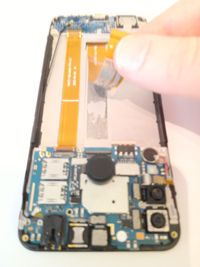
4. Peel up the ribbon cable.
Peeling up the ribbon cable will free it to be removed along with the display.
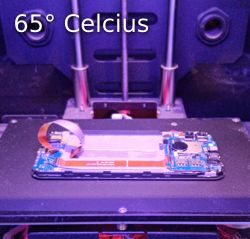
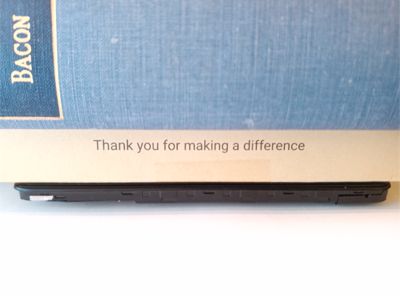
PeelRibbonCable
 
5. Heat the display
The glue holding the display in place is softened by high temperatures. In the image below, a heated plate set to 65° Celcius has been used. The phone has been placed face-down for several minutes to allow the heat to penetrate the glue. A heat gun can also be used, but may be more likely to burn or melt other parts of the phone if not used cautiously. A heat gun that can e set to a lower temperate is recommended.
65Degrees
 
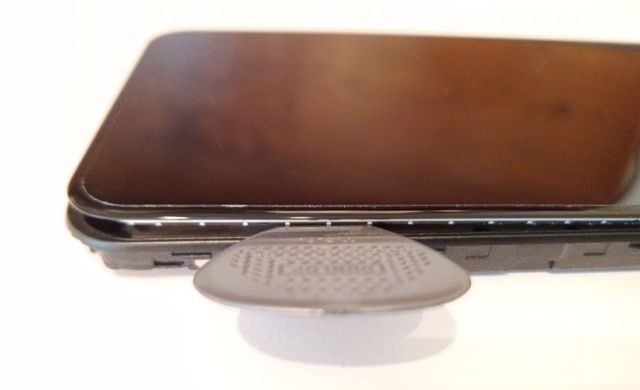
6. Remove the display
Insert your spudger between the frame of the phone and the edge of the display. It will take some force to get started, but should move easily. Work it around the circumference of the display to separate it from the frame of the phone, then lift the display out. If you aren’t able to work the spudger around the display easily, you may need to heat the display for a longer period of time or raise the temperature of your hot-plate or heat gun slightly.
spudger
 
7. Line the phone frame with adhesive
The phone display normally rests on a thing lip that’s slightly recessed in the phone frame. Use a suitable adhesive with an applicator or fine nozzle lay a line of adhesive along this lip. Be careful not to get adhesive in the speaker hole at the top edge of the screen, or camera lens or proximity sensor right beside it.
Adhesive
 
8. Place the screen
Pass the ribbon cable of the new screen through the rectangular hole in the frame and lower the screen, fitting it into the recess. Adjust the position to make it’s straight, and fully seated, then use gentle clamps or weight it evenly to hold it in place as the adhesive sets. When it’s positioned and held in place, wipe up any excess adhesive that has been pressed out along the edge of the screen. Let the phone sit for at least 24 hours.
Clamp
 
9. Reassemble the phone
When the glue has set, reassemble the phone. There will probably be enough adhesive left on the frame to hold the new ribbon cable in place. Insert it into the cable connector and rotate the lock back down to hold it in place. Make sure cable is positioned in a way that allows the battery to fit, then replace the information sticker.

Snap the upper board cover back in place, then fasten it in place with the seven screws. If the board cover doesn’t snap into place properly, make sure the fingerprint sensor is centered in the hole and that the antenna cable to the right of the SIM slots is tucked into its channel along the edge of the phone.

Insert the battery, then put the battery cover back on the phone.

4 Likes

So, where can a new screen for the Tera 1 be found? Vice that, why is there no permalink on the site to work through sending a unit back for repair at a “flat fee”? I have no idea how to take advantage of something you continue to use as a selling point.

Hi @cpangracs - we continue to use our email support for repairs. Please email us at support@myteracube.com to get the process started.

Hello!
Super happy with the phone, but I’ve cracked my screen unfortunately (dropped it, should have had the case on it…)

I understand I could send it back to Teracube for repair, or I think I could buy a new screen and screen protector? By modifying some urls, I found this page, but the link to the spare parts page redirects to the 2e ordering page.

Would love to try repairing it myself - what is my next step here? Alternatively, if I wanted to send it in for repair, what should I do?
mt

Hi @mthomas - sorry to hear about your screen. We are slowly putting our spare parts in stock everywhere. As of now, they can be ordered in the US only.

In either case, just send an email to support@myteracube.com to look at your options.

1 Like

Hi,
I would love to repair my broken sceen by myself too. Are there some news for the shipping of the spair parts, in particular screen for the Teracube2e, in EU - Italy at this moment?
thank you for your great work and support

We have screen replacement part stock in the US and Canada as of now. EU stock should be in within 3-4 weeks. Is that something you could wait for?

1 Like

Yes it is :slight_smile:

Thank heavens I’m not the only one… Same story here, dropped phone while a few days without the case… :woozy_face:
I would also be interested in a replacement screen in Europe (Germany).
Please keep us updated in this thread!
Thanks so much!

Hi @Heidrun_Holzapfel - welcome to Teracube forums. We are in the process of shipping screen units to the EU warehouse. Will take 2 weeks. Would that be fine? Another option is to avail of our repair service by emailing support@myteracube.com.

1 Like

Hi Sharad, thanks for your reply! I look forward to hearing from you regarding the way I could purchase the replacement screen in EU when they go on sale here :smiley:!

1 Like

So do I remove the screen from the new chassis the replacement comes with? Or do I remove the guts from my old phone and install to the new screen chassis?? I’m confused. my screen is already off the old one though I guess the glue gave out.

If your screen part came with chassis, then you transfer the components from the old phone to the new chassis.

1 Like

I also received my replacement screen it came promptly. I was pleased to see that it was already mounted on a chassis.
Are there any guides on how to transfer all the components from the old phone to the new chassis?
It would be helpful to know which components are glued on and the best way to remove them without causing damage.

Sorry - that guide is still on our to-do list. you might have seen this disassembly already - is that any helpful or are there any specific questions we can answer?

So I just replaced my screen based on these instructions. It was (mostly) successful and would be confident to do it again. However, the screen replacement on your website includes the back housing (looks like all that was missing was the MOBO and USBC board). Decided the safest/easiest thing to do was to remove the glass screen from the new part and continue with the instructions.

Was also able to use 1mm TESA tape because I had that lying around. Seems to be holding up.

I did do a tiny amount of damage to the new screen in the process. Think some dust got in between the glass and sensor while prying open, so there’s some small black spots. Nothing major.

Would recommend updating this based on the inventory, or just selling the glass screen since that’s the piece that ends up breaking.

1 Like

I think we will be sticking to the new screen part (with the metal body). Have pinged our repair partner and my colleagues to see when we could put up this video.

Ok, so my screen broke and I ordered a replacement screen.
It came with the metal chassis on the back.

Since I would never put any plastic parts on anything heated,
I took the phone apart and transfered all the parts to the new chassis.

The microphone sheared off and is completely f-ed now. The speaker also got a dent and the phone is mute now. I can use headphones no problem, but a speaker would be nice.

I feel a bit arsed now.
I’ll order a new e2 anyway, but would you compensate for sending me a part that actually does not fit?

Could you please elaborate on which part does not fit?

yeah, sharad.
i expected nothing.
bye