Update: There is a new process for Teracube 2e phones that is far easier and more automated. Check it out.
** Caution **:
Only use “Download” mode. Never erase or wipe memory using SP Flash.
Please get the latest version of SPFlash from below (we have updated it recently).
Warning This is for advanced users only. Can lead to corruption of your storage which might not be fixable locally and may require a paid replacement of your phone. You have been warned.
There are a few situations, like downgrading to an older Android version or reverting to factory image from a custom rom, that may require flashing Android to your Teracube using a PC. The steps below will help you to use SP Flash to write a system image to a phone.
Note: Flashing a system image will completely erase all data on the phone. Back up all important data before performing these steps.
Note: Leave your phone unplugged form the PC until instructed to plug it in.
Prepare the PC
-
Download latest version of SP Flash here - we have made it even safer to use.
-
Unzip SP Flash, then navigate inside the unzipped directory and run
flash_tool.exe -
Download and extract the system image you want to flash to your phone. The currently available images are (download the image based on your phone model)
**Important: Carefully Select the Teracube 2e firmware based on the serial number of the unit you have. Otherwise, you might brick your phone or lose a working fingerprint.
Read more here to identify your Teracube 2e batch.
Teracube 2e 2nd batch (SN: 2021)
Teracube 2e 1st batch (SN: 2020)
-
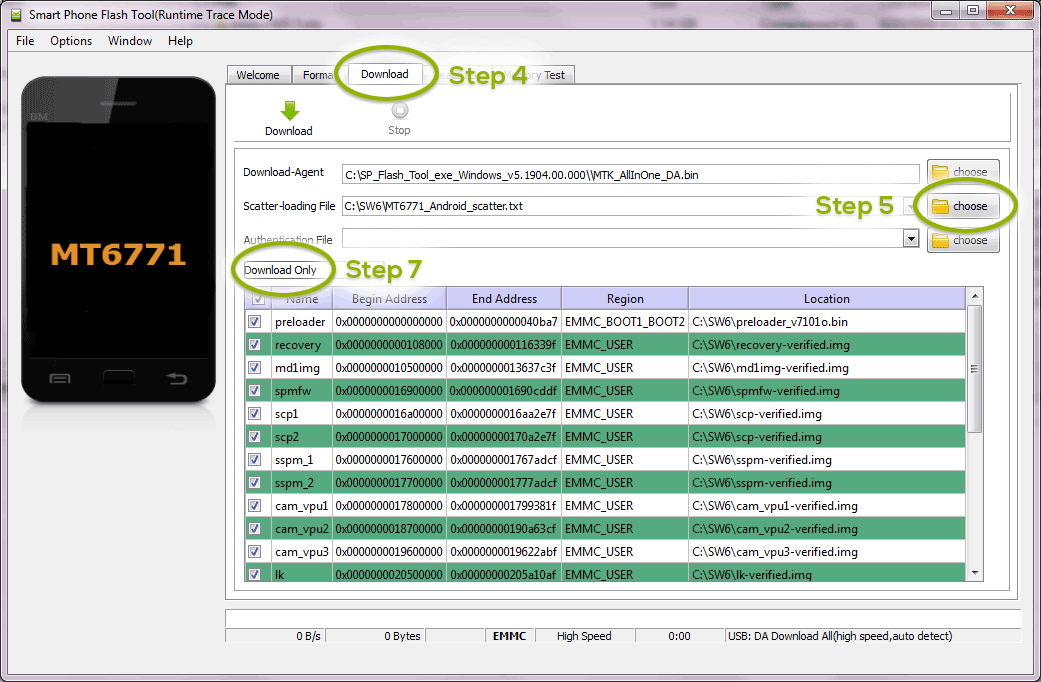
In SP Flash, select the Download tab.
-
Click the “Choose” button beside the option named “Scatter-loading file”.
-
In the file selection dialog, navigate to the extracted system image directory and select the scatter file. It should be a
.txtfile with the word “scatter” in its name. For example, the scatter file in the SW6 archive is namedMT6771_Android_scatter.txt. -
After selecting a scatter file, the table at the bottom of the SP Flash panel should be filled with a list of partitions, and files to flash to the partitions. Make sure the drop-down menu above this table is set to “Download Only”, and make sure all of the rows are checked for flashing.
Shut down your phone
Your phone must be powered off to be flashed by SP Flash.
Flash the Image
When the phone and PC are both prepared, follow the steps below to flash the image:
-
Click the Download button in SP Flash. The button has a green arrow icon. SP Flash will begin waiting for your phone to become visible.
-
Make sure your phone is powered off. Plug in the phone, then wait. SP Flash will display a series of progress bars as the image is flashed to your phone. When the process is complete, a small window with a checkmark will appear to let you know the process was successful.
Note: If your phone is boot-looping, then replace steps 8-9 with the following:
8. Click the “Download” button on SP Flash.
9. Then insert the USB cable into the phone precisely when its screen is dark. You may have to repeat this to get the timing right.
Note: Windows 10 should have the drivers needed to use SP Flash by default. If SP Flash fails to detect your Teracube, you may need to install the drivers below, then reboot your PC, before flashing.
Driver Link
System Setup
Because all data is erased by flashing an image, the phone will need to be configured as if it were brand new.

 Has anyone tried this on a clean PC to see if it’s as easy as quoted, without any pre-existing development tools/drivers installed?
 which isn’t available automatically in Windows by default.
 )
) thank you again.